Procedural Terrain generation-Houdini (noise types and masking)- Research I Nona Bocheva - Week 4
- Oct 5, 2023
- 4 min read
Updated: Jan 28, 2024
Ideate
Note:
This research was done considering one of the existing concepts for the project. The goal was to produce procedural terrain that can be tweaked by the audience real-time and explore possibilities with unique changing environments.
This document aims to explore the possibilities of creating a real-time environment in Houdini using a procedural tool. This goal of the research is to explore the existing options for creating easily-changed environments, if possible in real time, which look as realistic as possible and do not require too much tweaking to achieve the desired result. A tool like this can possibly save a lot of time for my team when having repeatable tasks and wanting to create similar environments. I will be researching both existing tools and will also try to create a tool of my own which an be later utilized in Unreal engine.
What really is procedural generation
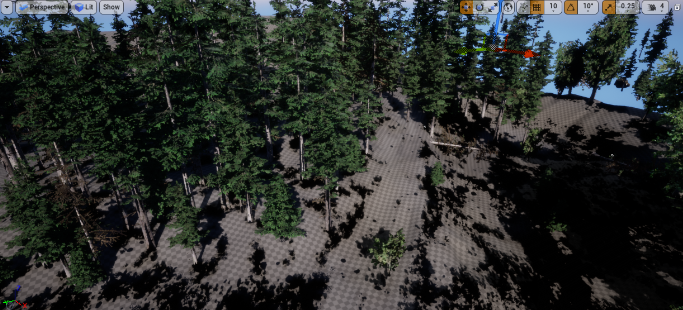
Procedural generation is a technique a person uses to create data such as 3D models, textures, meshes and more, using different types of algorithms. Procedural generation algorithms are rules or sets of instructions used to create content automatically, rather than manually. Say that a person wants to create a vast forest-like environment filled with trees, there are trees, hills, hollows and more. Rather than remodeling each component of the environment manually, the goal is to use simple sliders or mask to tweak the exiting models. This can also be done for more complex effects such as erosion, weathering and even different biomes within a single environment. An example can be using a masking tool to procedurally place trees in an environment, rather than copy - paste a single three thousands of times. A technique like this can not only save a lot of time but also allow for more creative freedom, since everything is easily changeable and also allows people that are not familiar with Houdini to navigate effortless trough the project.
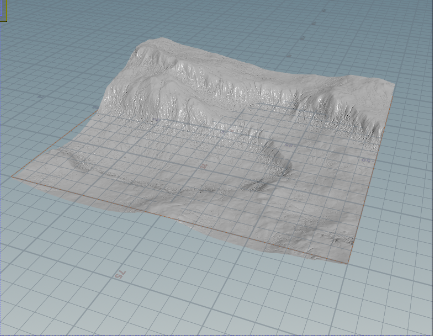
Lets say one has this simple plain made by using height fields node(will be explained more later in the document). Next thing the person wants is to place trees whether on the higher or lower parts of the environment (artistic choice). What can be done is "painting" a mask (marking the place where trees are growing ).


2. Creating various procedural environments using "The complete A-Z terrain handbook" by SideFX. https://www.sidefx.com/tutorials/the-complete-a-z-terrain-handbook/
a) About
This short course will cover some Heightfield basics ( Heightfield nodes - set of tools and operations used for working with grayscale images that represent elevation data and more specifically - terrains.) Heightfield nodes allow for sculpting, manipulation and generation of terrains and landscapes.
Since it is still not sure what kind of biomes will be needed for this project, these tutorials can be useful since they concentrate on three different types - one desert-like, an icy and fiery one. Exploration of creation of textures will also be included just so a realistic look can be achieved.
Notes from tutorials:
Basics of Heightfields
Basically, Heightfields are are a two-dimensional representation of a 3D terrain. The 3D look comes from the manipulation of the height of the plane which also gives it the realistic
-Heightfield node consists of "Height" and "Map", one always starts by manipulating the height
a) Heightfield patter - a node that allows for the creation of complex patterns and textures on a terrain. These patterns can be applied on terrains elevation, color and other attributes.

b) Heightfield noise - a useful node within Houdini for adding randomness and natural variation to planes, making them appear more like a realistic terrain. By adjusting parameters and adding different noise types:
Perlin noise - creates smooth and coherent and organic - looking graphics, suitable for terrains such as clouds and naturalistic terrains. (soft gradients and realistic appearance).


2. Voronoi noise - resembles cellular or geological patterns - mosaic cells, suitable for rock formations, terrain fractures or complex structure patterns.


3. Worley noise (cellular) - creates patterns based on the proximity of points or cells. it can produce cellular or spotted patterns, which are often use in terrain distribution - eg. scattering vegetation, natural formations (procedural placement); works by scattering points randomly through space;


4. Simplex noise - improved version of Perlin noise, since it has superior qualities in terms of pattern generation;
Notes: These are types of nodes I found useful when generating procedural terrains, best approach can also be combining different types of noise to achieve desired realistic results.
I am also attaching some useful links that might be useful when generating different types of terrains, however for now I am concentrating on general information, since there is no concrete idea about the visuals for this project.

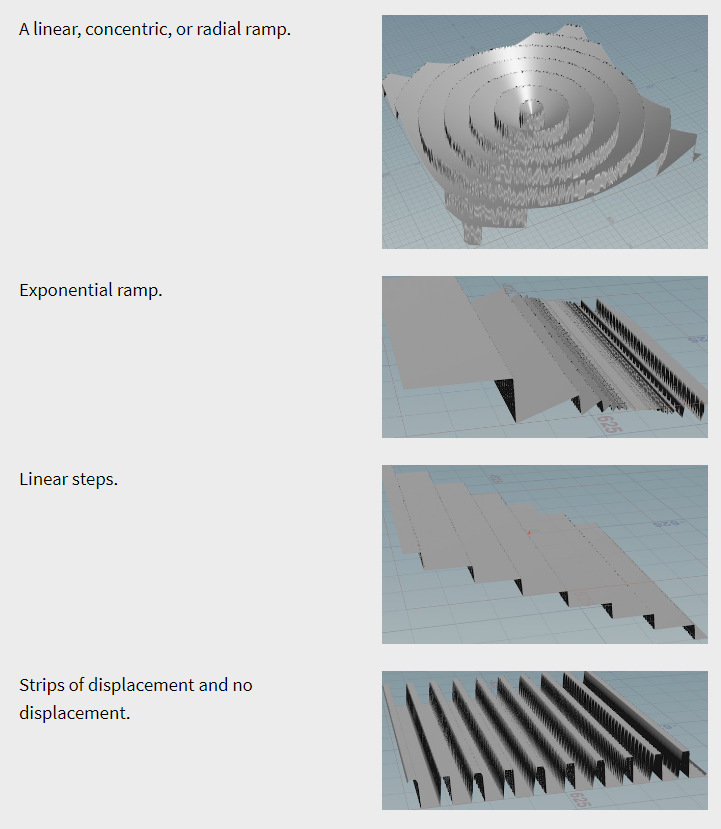
Useful image with different types of noise in Houdini that can be helpful when choosing desired effects.
2. Masking and painting
a) Mask layers - adds tow mask layers to the output; essential when creating terrains that allow control over various aspects such as texturing, vegetation, distribution and aplication of effects;
- Creating masks can be done in a couple of ways:
Paint masks - masks are drawn directly onto the terrain manually, using Heightfield Paint" tool;

Generating masks - masks can be generated procedurally, are noise - based such as "Heightfield Erode" or "Heightfield noise";

Importing external masks - masks can be imported in Houdini using images that can be applied to the terrain; With the image shown below an external image of butterfly is applied onto a plane and creates a texture in the shape of butterfly by changing the amplitude. This is a great way for manually altering terrains as the result can turn out realistic and unique.


However, there can always be some visible artefacts when using this technique, but with some tweaking it can probably be fixed / smoothed out as shown in the image below.


Comments